こんにちは!ぴちおです。
前回プレイヤーを作成したので、
次は敵キャラを表示したいと思います。
まずは、ヒエラルキー→3Dオブジェクト→カプセル
位置をプレイヤーと被らないように
x:10,y:1,z:10に変更。
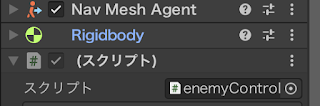
コンポーネント追加から
ナビメッシュエージェントと
リッジボディと
新しいスクリプト「enemyController」をセット
スクリプトはScriptフォルダに入れておく
あと、プレイヤーと敵がわかるように色をつけます。
プロジェクトの+からフォルダを作成、名前を「Material」とする
プロジェクトの+からマテリアルの作成
できたマテリアルをCtrl+Dで複製
それぞれ名前を「playerMaterial」「enemyMaterial」とする
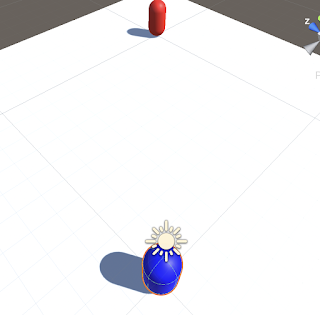
わかりやすいようにplayerMaterialの色を青、enemyMaterialの色を赤にする
それぞれ、マテリアルをアタッチする(ドラッグ&ドロップ)
続いて、敵の動きをつけます。
とりあえず、初めは徘徊して、視界にプレイヤーが入ったら追っかけてくるようにします。
まずは徘徊の仕組み。
ランダムに移動可能な場所を取得。
そこまでNav Meshで移動。
到着したら決められた時間待機して、再びランダムな場所を取得して移動を繰り返す。
[NavMeshを使った巡回するNPCのつくりかた]を参考に作成。
クラス用に新規C#を作成「DestinationController」という名前にする。
それをダブルクリックしてスクリプトを作成していきます。
using System.Collections;
using System.Collections;
using System.Collections.Generic;
using UnityEngine;
public class DestinationController : MonoBehaviour
{
//public float wanderRange;
//目的地
[SerializeField] private Vector3 destination;
public void CreateDestination(Vector3 pos,float wanderRange)
{
//pos:引数現在地
//wanderRange:ランダム範囲
//ランダムな場所を設定
SetDestination(new Vector3(Random.Range( pos.x - wanderRange, pos.x + wanderRange), 0, Random.Range( pos.z - wanderRange, pos.z + wanderRange)));
}
// 目的地の設定
public void SetDestination(Vector3 position)
{
destination = position;
}
// 目的地の取得
public Vector3 GetDestination()
{
return destination;
}
}
CreateDestinationは
posは現在地、要はenemyのtransform.positionです。
wanderRangeはどのくらいの範囲移動するかです。
続いて、enemyController側を作成。
using System.Collections;
using System.Collections.Generic;
using UnityEngine;
using UnityEngine.AI;
[RequireComponent(typeof(NavMeshAgent))]
[RequireComponent(typeof(DestinationController))]
public class enemyController : MonoBehaviour
{
private float i=0;
private NavMeshAgent agent = null;
[SerializeField] private DestinationController destinationController;
void Start()
{
agent = GetComponent<NavMeshAgent>();
destinationController = GetComponent<DestinationController>();
destinationController.SetDestination(transform.position);//スタートを待ち状態から始める
}
void Update()
{
if(Vector3.Distance(transform.position, destinationController.GetDestination()) < 1.5f)
{
do
{
destinationController.CreateDestination(transform.position,10f);//ランダムな行き先設定
i++;
if(i>100){
break;
}//予防策
} while (!RandomWander());//ルートがあるかの確認
}
}
private bool RandomWander() {
//指定した目的地に障害物があるかどうか、そもそも到達可能なのかを確認して問題なければセットする。
//pathPending 経路探索の準備できているかどうか
var path = new NavMeshPath();
bool rFlg = false;
if (!agent.pathPending) {
if (agent.remainingDistance <= agent.stoppingDistance) {
//hasPath エージェントが経路を持っているかどうか
//agent.velocity.sqrMagnitudeはスピード
if (NavMesh.CalculatePath(transform.position, destinationController.GetDestination(), NavMesh.AllAreas, path))
{
agent.SetDestination(destinationController.GetDestination());
rFlg = true;
}
}
}
return rFlg;
}
}
using UnityEngine.AIは忘れないように!!
これから到着したら、ちょっと待機する機能を追加します。
using System.Collections;
using System.Collections.Generic;
using UnityEngine;
using UnityEngine.AI;
[RequireComponent(typeof(NavMeshAgent))]
[RequireComponent(typeof(DestinationController))]
public class enemyController : MonoBehaviour
{
private float i=0;
private NavMeshAgent agent = null;
[SerializeField] private DestinationController destinationController;
private bool arvFlg = false;
private float waitMaxTime = 5f;
private float waitTime;
private float waitCount = 0f;
void Start()
{
agent = GetComponent<NavMeshAgent>();
destinationController = GetComponent<DestinationController>();
destinationController.SetDestination(transform.position);//スタートを待ち状態から始める
waitTime = Random.Range(1,waitMaxTime);//まちじかんをランダム
}
void Update()
{
if(Vector3.Distance(transform.position, destinationController.GetDestination()) < 1.5f)
{
//到着したら
if(arvFlg)
{
//待機時間過ぎたか?
if(waitCount > waitTime)
{
//過ぎた場合行き先セットしてタイマーとフラグクリア
do
{
destinationController.CreateDestination(transform.position,10f);//ランダムな行き先設定
i++;
if(i>100){
break;
}//予防策
} while (!RandomWander());//ルートがあるかの確認
arvFlg=false;
waitTime = Random.Range(1,waitMaxTime);
waitCount = 0;
}
else
{
//過ぎてない場合、カウント
waitCount += Time.deltaTime;
}
}
else
{
arvFlg=true;
}
}
}
private bool RandomWander() {
//指定した目的地に障害物があるかどうか、そもそも到達可能なのかを確認して問題なければセットする。
//pathPending 経路探索の準備できているかどうか
var path = new NavMeshPath();
bool rFlg = false;
if (!agent.pathPending) {
if (agent.remainingDistance <= agent.stoppingDistance) {
//hasPath エージェントが経路を持っているかどうか
//agent.velocity.sqrMagnitudeはスピード
if (NavMesh.CalculatePath(transform.position, destinationController.GetDestination(), NavMesh.AllAreas, path))
{
agent.SetDestination(destinationController.GetDestination());
rFlg = true;
}
}
}
return rFlg;
}
}
到着したら、到着フラグ立てる、到着フラグ立ってれば待ちカウントアップして、規定値になったら処理を行う。
destinationController.CreateDestination(transform.position,10f);
ここの10fを長くすると長距離、短くすると短距離になります。
private float waitMaxTime = 5f;
ここの数値を長くすると待ち時間の最長時間が長くなります。


0 件のコメント:
コメントを投稿